

How To Access Network Shared Folder In Windows 10
Here are some answers to common questions nigh changes to file and binder sharing in Windows 11:
To share a file or folder over a network in File Explorer, do the following:
-
Right-click (or long-press) a file, and then select Evidence more than options >Give access to > Specific people.

-
Select a user on the network to share the file with, or select Everyone to give all network users access to the file.
If you select multiple files at once, yous can share them all in the same mode. It works for folders, too—share a binder, and all files in information technology volition be shared.
Right-click or press a file or folder, so select Prove more options >Give access to > Remove access.

File Explorer shows the Remove access option for all files, even those that aren't being shared over a network.
Open up File Explorer, and then type \\localhost into the address bar.
Note:When you lot've shared a file from a binder in your user profile and y'all get to \\localhost, you'll see your user profile and all its files there. This doesn't mean that all of your files are shared—just that you accept access to all your own files.
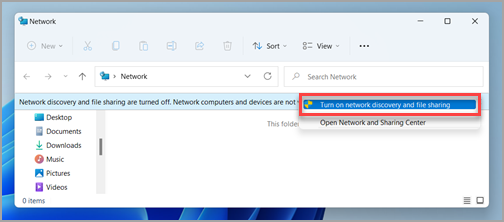
If you lot open File Explorer, get to Network, and run into an error bulletin ("Network discovery is turned off…."), you'll need to turn on network discovery to see devices on the network that are sharing files. To plough it on, select the Network discovery is turned off banner, then select Turn on network discovery and file sharing.
To troubleshoot problems with sharing files or folders, follow the steps below on all computers from which yous're trying to share.
-
Update Windows. Ensuring all machines are every bit updated as they can be is key to making certain you lot aren't missing out on any driver or Windows updates.
Open Windows Update -
Make certain the computers are on the same network. For case, if your computers connect to the internet through a wireless router, make sure they all connect through the aforementioned wireless router.
-
If you're on a Wi-Fi network, set up it to Individual. To find out how, read Brand a Wi-Fi network public or private in Windows.
-
Turn on network discovery and file and printer sharing, and turn off password protected sharing.
-
Select the Start push, and then select Settings .
-
In the Detect a setting search bar, type manage advanced sharing settings and select Manage avant-garde sharing settings from the suggested results.
-
In the Advanced sharing settings window that appears, nether Private, select Turn on Network discovery and Turn on file and printer sharing.
-
Under All Networks, select Plow off password protected sharing.
-
-
Brand sharing services start automatically.
-
Press the Windows logo fundamental + R.
-
In the Run dialog box, type services.msc, and and so select OK.
-
Right-click each of the following services, select Properties, if they're not running, select Start, and next to Startup type, select Automatic:
-
Part Discovery Provider Host
-
Function Discovery Resource Publication
-
SSDP Discovery
-
UPnP Device Host
-
-
Related topics
-
Share things with nearby devices in Windows
-
Share files in File Explorer
-
Make a Wi-Fi network public or private in Windows
-
Fix network connection issues in Windows
In Windows 10, some features of file and folder sharing over a network accept inverse, including the removal of HomeGroup. Read on for answers to common questions about other changes to file and folder sharing in Windows 10.
To share a file or folder in File Explorer, exercise one of the following:
-
Right-click or press a file, select Give access to > Specific people.
-
Select a file, select the Share tab at the superlative of File Explorer, and so in the Share with section select Specific people.

Select a user on the network to share the file with, or select Everyone to requite all network users access to the file.
If y'all select multiple files at in one case, you tin can share them all in the same way. It works for folders, too—share a binder, and all files in it volition be shared.
To end sharing in File Explorer, practice one of the following:
-
Correct-click or press a file or folder, then select Requite access to > Remove access.
-
Select a file or folder, select the Share tab at the peak of File Explorer, and and then in the Share with department select Remove admission.

File Explorer shows the Remove access choice ("End sharing" in older versions of Windows 10) for all files, even those that aren't being shared over a network.
Open File Explorer, then type \\localhost into the address bar.
Annotation:When you've shared a file from a folder in your user profile and you lot get to \\localhost, you'll see your user profile and all its files in that location. This doesn't mean that all of your files are shared—just that you take access to all your own files.
If yous open up File Explorer, become to Network, and see an error message ("Network discovery is turned off…."), you lot'll need to plow on network discovery to see devices on the network that are sharing files. To turn information technology on, select the Network discovery is turned off banner, then select Turn on network discovery and file sharing.

To troubleshoot problems with sharing files or folders, follow the steps below on all computers from which you're trying to share.
-
Update Windows. Ensuring all machines are as updated as they tin exist is key to making sure you aren't missing out on any driver or Windows updates.
Open Windows Update -
Make sure the computers are on the aforementioned network. For example, if your computers connect to the internet through a wireless router, make sure they all connect through the same wireless router.
-
If y'all're on a Wi-Fi network, fix it to Private. To observe out how, read Make a Wi-Fi network public or individual in Windows.
-
Turn on network discovery and file and printer sharing, and turn off countersign protected sharing.
-
Select the Start button, and so select Settings > Network & internet , and on the right side, select Sharing options.
-
Nether Private, select Turn on Network discovery and Plough on file and printer sharing.
-
Nether All Networks, select Turn off password protected sharing.
-
-
Make sharing services start automatically.
-
Printing the Windows logo fundamental + R.
-
In the Run dialog box, type services.msc, and and then select OK.
-
Right-click each of the post-obit services, select Properties, if they're not running, select Start, and adjacent to Startup blazon, select Automatic:
-
Office Discovery Provider Host
-
Part Discovery Resource Publication
-
SSDP Discovery
-
UPnP Device Host
-
-
Related topics
-
Share things with nearby devices in Windows
-
Share files in File Explorer
-
Make a Wi-Fi network public or private in Windows
-
Set up network connection issues in Windows
Source: https://support.microsoft.com/en-us/windows/file-sharing-over-a-network-in-windows-b58704b2-f53a-4b82-7bc1-80f9994725bf
Posted by: findlayroques.blogspot.com
0 Response to "How To Access Network Shared Folder In Windows 10"
Post a Comment